What is it?
DBP (David's Batch Processor) is a simple batch processing
plugin for the Gimp - it allows the user to automatically perform operations (such
as resize) on a collection of image files. Its main advantage is that the user
does not have to learn a scripting language. Like the Gimp itself, DBP
relies on a graphical interface.
The user creates a list of images, and sets up the processing required for
each image. The results of the current settings can be displayed. Once the
required sequence of operations has been set up,
DBP performs the same processing on each image in turn.
The images can be colour corrected, resized, cropped, and sharpened, then
renamed and saved to a different file in a specified image format. All
the steps (except loading and saving the image!) are optional; so the simplest
use of DBP is just to convert a number of image files from one format
to another.
Note that DBP is intended for RGB, not indexed images. Trying to process
an indexed image will probably just cause an error, and DBP will halt.
Also, DBP will not overwrite
the original image (in fact, it should not overwrite any file) - images must at least
be either renamed (possibly by changing the image format) or moved to a different
directory.
Where do I get it?
DBP is licensed under the GPL.
The latest version is 1.1.9. It has been updated
to work with recent Gimp 2.6 versions, but will probably work with earlier
versions. The source is available at:
http://www.ozemail.com.au/~hodsond/dbpSrc-1-1-9.tgz.
If you have problems with this version, earlier versions are still
around at:
http://www.ozemail.com.au/~hodsond/dbpSrc-1-1-8.tgz
and:
http://www.ozemail.com.au/~hodsond/dbpSrc-1-1-5.tgz.
There is no configure file, use make install to build and install
in your local gimp plugins directory. You will need g++ and the gimp development
packages for the appropriate Gimp version - if you can compile C++ and
can build any other Gimp plugin, you should have no problems.
The Makefiles are very primitive and can be edited directly if needed.
Windows Users
I don't have the facilities to create Windows versions myself, but other
people have done so and sent them to me. Rodrigo Flores kindly provided me
with a Windows binary version of 1.1.8 which is available at:
http://members.ozemail.com.au/~hodsond/dbp-1.1.8.zip,
and
Michael Schumacher provided me with an earlier version:
http://www.ozemail.com.au/~hodsond/dbp-1.1.3.zip
Just download and unzip the file, and copy dbp.exe into your plugins folder -
check Edit/Preferences/Folders/Plug-ins to find out where it should go.
How does it work?
From the Filters menu in the main Gimp window (or Xtns in earlier versions),
select Batch Process...
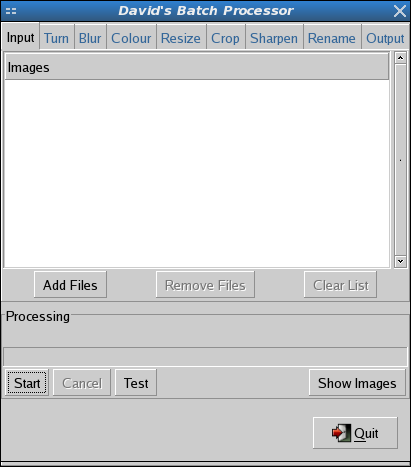
to bring up the DBP window. The top section lets you set up the processing
steps; the bottom section starts and stops the processing, and shows
its progress. Note that some of the controls are inactive; DBP disables controls
which currently have no effect.
The processing steps
are laid out on a series of pages, one for each step.
Hint: start at the Input page and set up each one in order.
Hint: use the Test button to see the effect of the
processing.
ToDo: need to see which steps are enabled without having to
go to their page.
ToDo: save and load processing settings.
Input
DBP starts with the Input page open.
The Input page is used to specify the images to process. The
Add Files button raises a standard GTK+-2 file selector. Note that
you can select multiple files, using shift-click to select a range of files,
and control-click to select and deselect individual files. Note also that
the input files can be in different image formats. (However, they should
all have different names when the file extension is removed.)
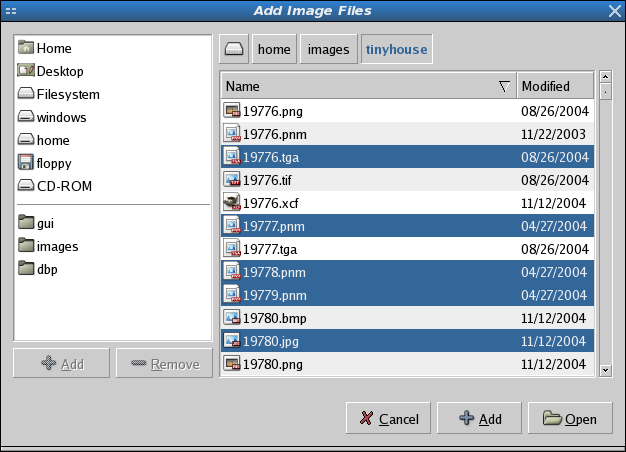
The Open button adds the selected files to the input list
and closes the file selector.
The Add button adds the
selected files to the list and clears the selection, but does not close
the dialog, so that you can add files from other directories. Close
simply closes the file selector without adding any more files.
Once the
file selector is closed, the file list can be edited by selecting
one or more entries and using the Remove Files button to
remove them, by using Clear List to clear the list completely.
You can add more files by pressing Add Files to reopen the
file selector.
Note: the file selector is modal, so you must close it before
you can adjust any controls in the main window.
ToDo: save and load input lists.
Processing
The next pages control the processing. Each page starts with an
Enable toggle, which turns on the image operation for that
page and lets you set the controls. To see the effect of all the
active operations (on the first image in the file list) at any
time, press the Test button. The operations are applied to
the images in the order shown on the pages.
Turn
If enabled, rotates the image through 90, 180, or 270 degrees.
Blur
If enabled, blurs the image.
Hint: uses Gauss IIR.
Colour
If enabled, adjusts brightness and contrast of the image, either
through the Gimp Auto Levels function, or by the control settings. The
image saturation can be adjusted, and the image can be converted to black
and white (although the image Mode will still be RGB, not Grayscale).
Note: converting to black and white does not give the same
result as reducing the saturation to zero.
ToDo: add gamma control.
Resize
If enabled, resizes the image. Resizing can be either relative to the
input image size, or to an absolute target size. Fixing the aspect ratio
of a relative resize locks the x and y sliders to the same value. There are
four options for an absolute resize. Exact will change the aspect
ratio of the image, if necessary, to fit the target size. Pad fits
the resized image inside the target size, then pads it to fit. Inside
creates the largest image which fits inside the target size, Outside
the smallest which fits outside.
Hint: padding uses the Gimp's current background colour.
Hint: resize uses the Gimp's Interpolation Type settings.
Crop
If enabled, crops a region from the image.
Warning: The region must be contained within the image area.
Sharpen
If enabled, sharpens the image.
Hint: uses Unsharp Mask.
Rename
Sets the directory and file name to use when saving the processed image.
Source Dir refers
to the directory containing the original image. If another directory is
chosen, the image will be saved there instead. The original file name
can have a prefix or postfix added; its extension will be replaced by
the appropriate extension for the image format chosen on the next page.
An example of the renaming is shown (using an imaginary extension).
Hint: DBP will not overwrite an existing file. The output
file must be renamed, have its extension changed, or be put into a different
directory.
ToDo: add relative directory path.
Also includes a toggle to flatten the image before saving, which will
mostly just remove the alpha channel. This doesn't really belong here, but
I needed this for a job and didn't want to add a new control page.
Output
Selects the image format for the processed file (and therefore its
extension). Appropriate extra controls will appear for different formats.
Warning: The format selection may include output formats that
are not installed on your system.
ToDo: fix that.
Common Controls
The Test button processes and displays, but does not save, the
first image in the file list. Use this to adjust the settings.
Once all the controls have been set as desired, click the Start button.
DBP will process each file in the file list. If Show Images is pressed,
then the images will be displayed as they are being processed.
Hint: if any process fails, the entire sequence will finish.
Hint: the Cancel button will not respond until the current
processing step finishes.
Hint: cancelling any of the processing steps (from the Gimp's popup
window for that step) will cancel processing.
Hint: DBP will not overwrite existing images. If you cancel
(or decide to repeat) a sequence you will need to delete any output images
before starting again.
Hint: the image displays are managed by DBP. Do not draw on, close,
or save from them.
Hint: untoggling the Show Images button, or quitting DBP,
will remove a leftover display.
ToDo: use separate thread for processing (don't lock up user interface).
ToDo: improve processing feedback.
ToDo: improve error reporting (what error reporting?)
History
- 0.1
original Dec 2001
- 0.2
removed some C++(C99?)-isms, to compile under gcc 2.95 (I hope)
- 0.3
fixed crash on OK, close after processing
rearranged processing controls
many minor tidyups
(unreleased)
- 0.4
converted to C++, I'm sick of working in C
- 0.5
added test mode, seems to be working OK
- 0.5.1
minor fix(?) to getting directory from multiple file selector.
- 0.5.2
fix some show/hide problems in output page.
- 0.5.3
add flatten, add cineon output format, minor gui tweaks.
- 0.5.4
add tiff output
- 0.5.5
made output formats generic, added option menu gui
- 0.5.6
fixes for gimp-1.3
- 0.5.7
fixes for gimp-1.3 past version 20...
- 1.0
tidied up, release for Gimp 2.x
- 1.0.1
changed gui of output formats to closer match Gimp versions
pre-test for output files
warning if no file to test
- 1.0.2
added auto levels to colour page
- 1.0.3
added conversion to black and white
reuse same display window
- 1.0.4
removed (unused) pthread code, to compile under Windows
added Gimp 2.2 specific code to hide progress popups
- 1.0.5 (unreleased)
added image rotation
indexed gif output
- 1.1
removed all Gimp and Gtk deprecated features
- 1.1.1
fixed Windows path bug
- 1.1.2
moved code from dbp.cc to op and gui
fixed flatten on resize with padding
fixed sharpen parameter type error in Gimp > 2.2.9 or 2.3.5
changed sharpen radius range to match Gimp
changed threshold control to match Gimp
added saturation to colour controls
changed file selector Cancel to Close
(probably) fixed "missing sentinel" warning on gcc 4.0
- 1.1.3
fixed another missing sentinel warning
removed -DGIMP_DISABLE_DEPRECATED from Makefile, to compile under 2.3.8(?)
- 1.1.4
added PAT format by request
- 1.1.5
fixed loading bug that halted DBP after processing a few images
- 1.1.6
added convert to greyscale / convert to indexed
- 1.1.7
fixed bug in colour controls
use new progress api for 2.3 and above
- 1.1.8
started to add gettext stuff
removed another gtk_file_selector, fixed breakage on gtk-2.6
- 1.1.9
fix longstanding deprecated Gtk problems
Comments, requests, complaints, or donations to:
hodsond@ozemail.com.au